
The Pokemon Trading Card Game is my favorite game of all time.
I run Elite4 Games and the local Pokemon League here in Langford, BC. We have League Challenges every month and a League Cup every quarter – more competitive events where you can earn Championship Points for the Pokemon World Champsionship – but more importantly for me, I host our casual Pokemon League where everyone can come hang out and play the Pokemon TCG in a more casual manner. If you’ve never played the physical TCG before, you are sorely missing out. And I mean that from the bottom of my heart. I want every collector, die-hard videogame player and casual fan to experience the card game at least once. So in my free time I build, test and assemble competitive meta decks that anyone can use for free at our weekly Pokemon League! The decks that I build fit different niches and are designed with different player experience and skill levels in mind. If you’ll grant me the time, I’d like to share these decks with you!
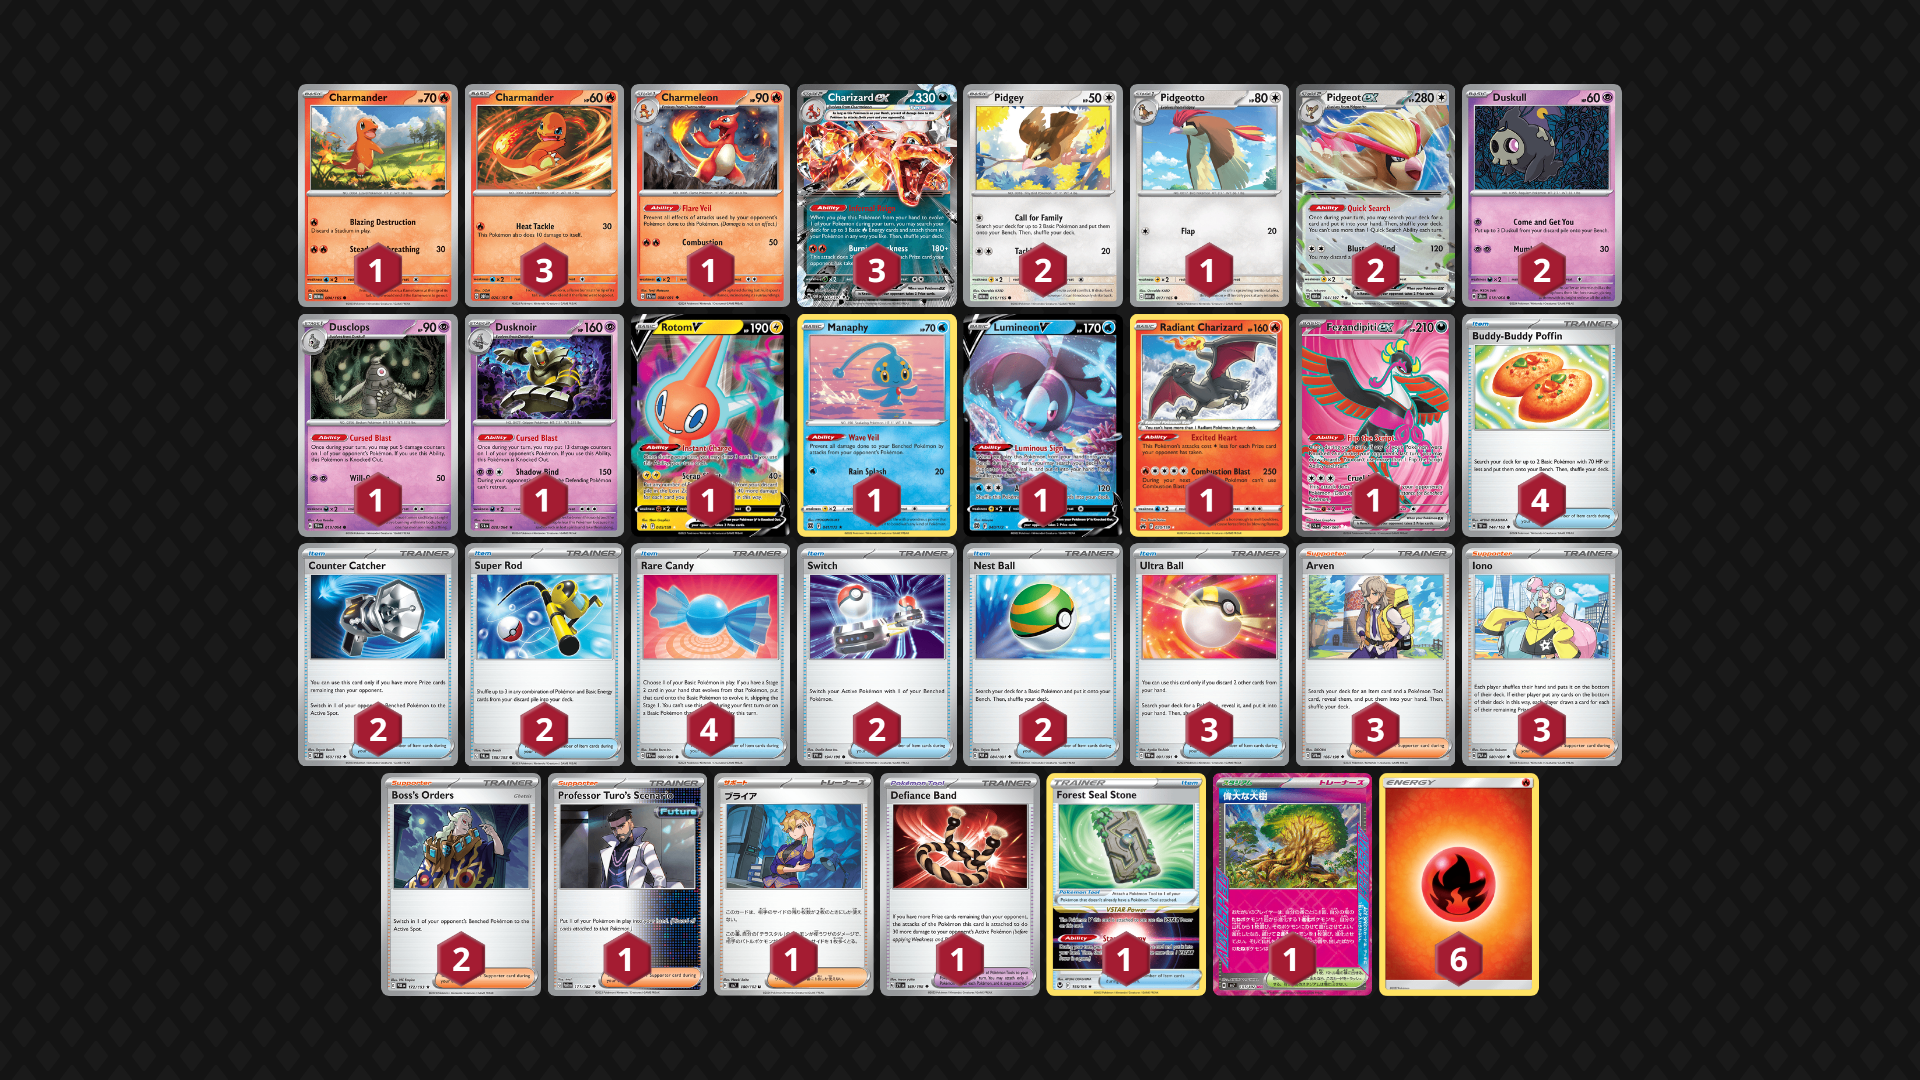
Charizard ex: Difficulty – 2/5
 <<< Click on the card for the full deck list! Have this open while reading the next section.
When you’re playing this deck you have one job – attack with Charizard ex every turn. That’s the whole goal! Every other card in the deck exists to facilitate this win condition. On your very first turn, your top priority is getting Charmander and Pidgey into play so that you can evolve them into Charizard and Pidgeot as quickly as possible. In order to do this, there are 4 Buddy Buddy Poffin that let you play 2 in any combination of Charmander & Pidgey onto your bench from your deck, as well as some more generic Pokemon searches like Nest Ball (any basic Pokemon) and Ultra Ball (any Pokemon at the cost of discarding 2 other cards). If you’re able to get your top priority pair into play, you’ll want to consider setting up your support Pokemon if you have the available resources remaining. These are Rotom, Manaphy & Duskull. Rotom V lets you draw 3 cards to end your turn instead of attacking – an ability with no drawback if you go first since you can’t attack anyway. Manaphy blocks damage to your bench Pokemon and Duskull will eventually become a martyr that sacrifices itself to deal big damage to your opponent’s Pokemon. Don’t get too distracted though! When your turn ends you should have at minimum 2 Charmander and 1 Pidgey in play. Anything less than that and you risk falling behind and losing the game. Click Here to see a standard Turn 1 board.
The next turn is where things get interesting! The most common set up for Turn 2 is to Rare Candy your Pidgey and immediately evolve it into Pidgeot ex. This lets you then search your deck for any card! This is often used to search for the missing piece of a Turn 2 Charizard – either a Rare Candy or Charizard itself to get that into play and start attacking. Just because that’s the most common solution doesn’t mean it’s the only solution though. Grand Tree is the Ace Spec of choice – a stadium that lets you evolve a Pokemon by searching for it’s evolutions in your deck. You also play Lumineon V to search for any supporter – in which you’ll want to snag an Arven. Arven then lets you search for any item (Rare Candy) and tool card (Forest Seal Stone). Attach Forest Seal Stone to your Lumineon or Rotom as the effect of it can only be used while attached to a Pokemon V. It lets you search your deck for any card – much like Pidgeot’s ability – but only once per game. But if you were following along, playing Lumineon V lets you combo different searches into getting any of your Pokemon fully evolved! Remember, your goal this turn is to be attacking with Charizard. Ideally you also a fully evolved Pidgeot, but if you have to pick between the two – pick Charizard! Charizard attaches energy to itself from your deck so you don’t even need to worry about attaching energy from your hand – but ONLY when you play it from your hand. Using Grand Tree's effect to evolve your Charmander will not let you attach energy from your deck.
Lastly, I’ll talk about the mid & late game. This is far less tumultuous than your first 2 turns. You’ll want to have a second Charizard ready to attack when your first one gets KO’d. You can use Pidgeot’s search power to help with this! You’ll also have a Radiant Charizard that deals big damage. It’s attack costs less energy for every prize card your opponent takes, so it’s better to use it in the late game after your other Pokemon have been knocked out. I touched on it briefly before, but Dusknoir will knock itself out to deal 130 damage to one of your opponent’s Pokemon. This is incredibly beneficial as it can help your prize math by getting the opponent to 2 prizes if they still have 3 remaining so your Briar can be used. It also lets Charizard ex deal more damage and Radiant Charizard require less energy to attack. You might be pretty light on cards in hand, so Fezindipiti ex will let you draw 3 cards if your opponent KO’d one of your Pokemon last turn. And that’s how the deck works! The vast majority of your games will see your opponent go down to 2 or even 1 last prize card remaining. As long as you’re attacking with Charizard every turn, you should be the first one to take all 6 of them.
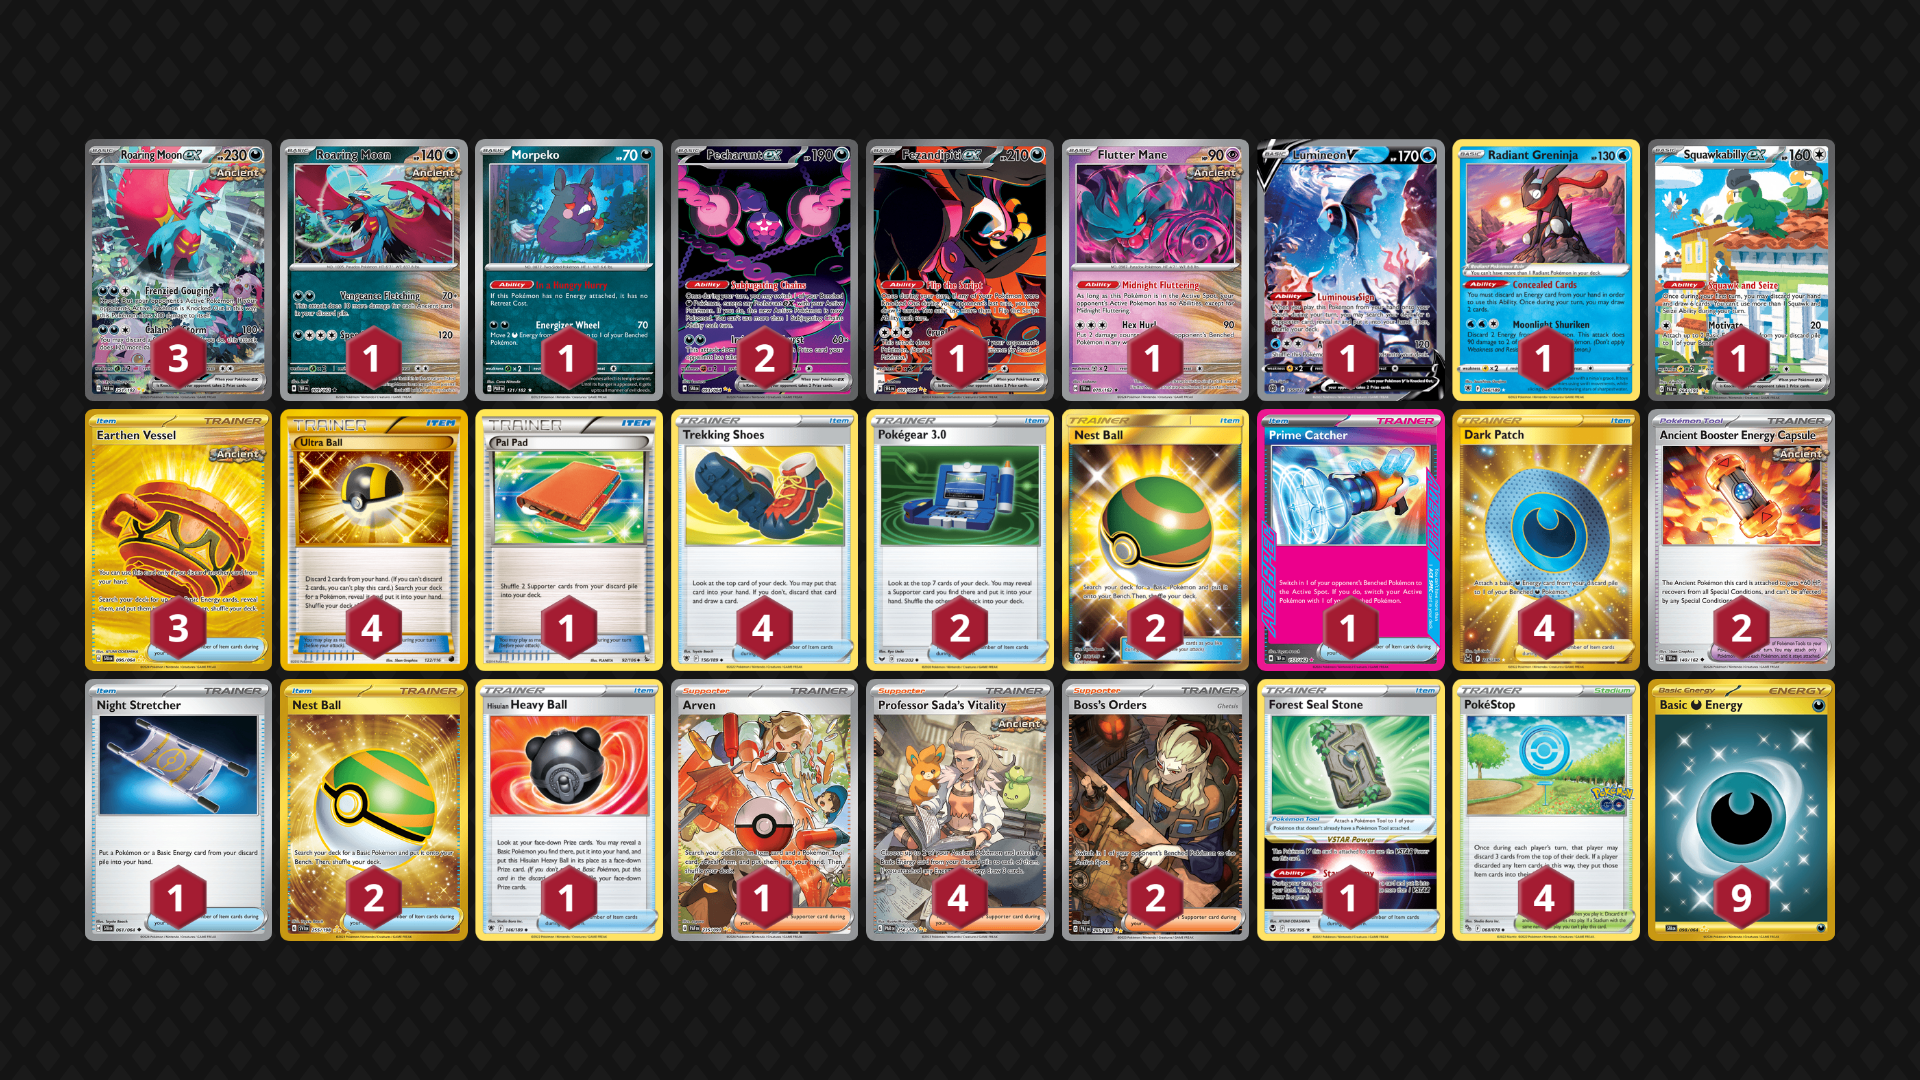
Roaring Moon: Difficulty – 3/5
 <<< Click on the card for the full deck list! Have this open while reading the next section.
This is my favourite deck personally! You are attacking every turn and the game only lasts 5 turns – whether you win or not. You want to go second when playing this build because you want to attack with Roaring Moon ex or the “baby” Roaring Moon on your first turn. And this deck is designed to do just that! Your first turn will involve having a Roaring Moon on the bench, getting it powered up with a combination of Dark Patch, Professor Sada’s Vitality and/or your manual energy attachment from hand. Couple that with Pecharunt ex’s ability to switch your fully powered Roaring Moon into the active position and you have a one-way ticket to Knock Out City! Radiant Greninja discards an energy and lets you draw 2 more cards while Squawkabilly ex exists to discard your whole hand and draw 6. Get your energy in the discard pile, accelerate them to Roaring Moon with Dark Patch & Sada, KO any Pokemon your opponent has active. Note: If your opponent wins the beginning coin flip and makes you go first, stick to the same plan of powering up Roaring Moon but instead of moving it to the active position, try to get Flutter Mane there instead to shut down any abilities your opponent’s active Pokemon may have. Click Here to see a standard Turn 1 board.
There’s A LOT to do on your first turn and not a whole lot to do on subsequent turns. You want to keep your conga line of Ancient lizards running and just keep throwing them at your opponent. You will overwhelm them with Roaring Moon ex’s ability to KO anything in the game while getting them fully powered with (ideally) minimal effort. This deck plays a slew of supporting Pokemon such as Fezandipiti (to draw cards when your Moon gets knocked out), Lumineon (for the same Arven + Forest Seal Stone combo to find any card combination in your deck) and Morpeko as a free retreat/pivot in between turns or with Pecharunt’s ability. So long as you have Pecharunt, you won’t be stalled out! The rest of your deck is outfitted with cards that either draw more cards or search for more useful cards. Ultra Ball & Ancient Vessel discard cards (energy) from your hand to search for more resources while simultaneously putting energy cards in the discard pile for Dark Patch & Professor Sada. PokeStop discards 3 cards from the top of your deck – or lets you add them to your hand if they’re items. So you can end up drawing 3 cards for free!
Roaring Moon doesn’t really have a “late game”. By Turn 3 you should have KO’d 2 of your opponent’s Pokemon. Or you’re probably going to lose… It is by all means a glass cannon. Cause more devestation in the early game than your opponent can handle and snowball from there. You play 1 Prime Catcher which lets you select your victim for the turn. Use this wisely to disrupt your opponent’s set up on turn 1 or 2. If you still have it available after that, you should be using it to clean up the last 2 prizes of the game by bringing up a benched 2-prizer. You also have Boss’s Orders for this purpose though, so don’t feel the need to hold on to the Prime Catcher. Prioritize it’s use in KOing the most vital piece to your opponent’s strategy.
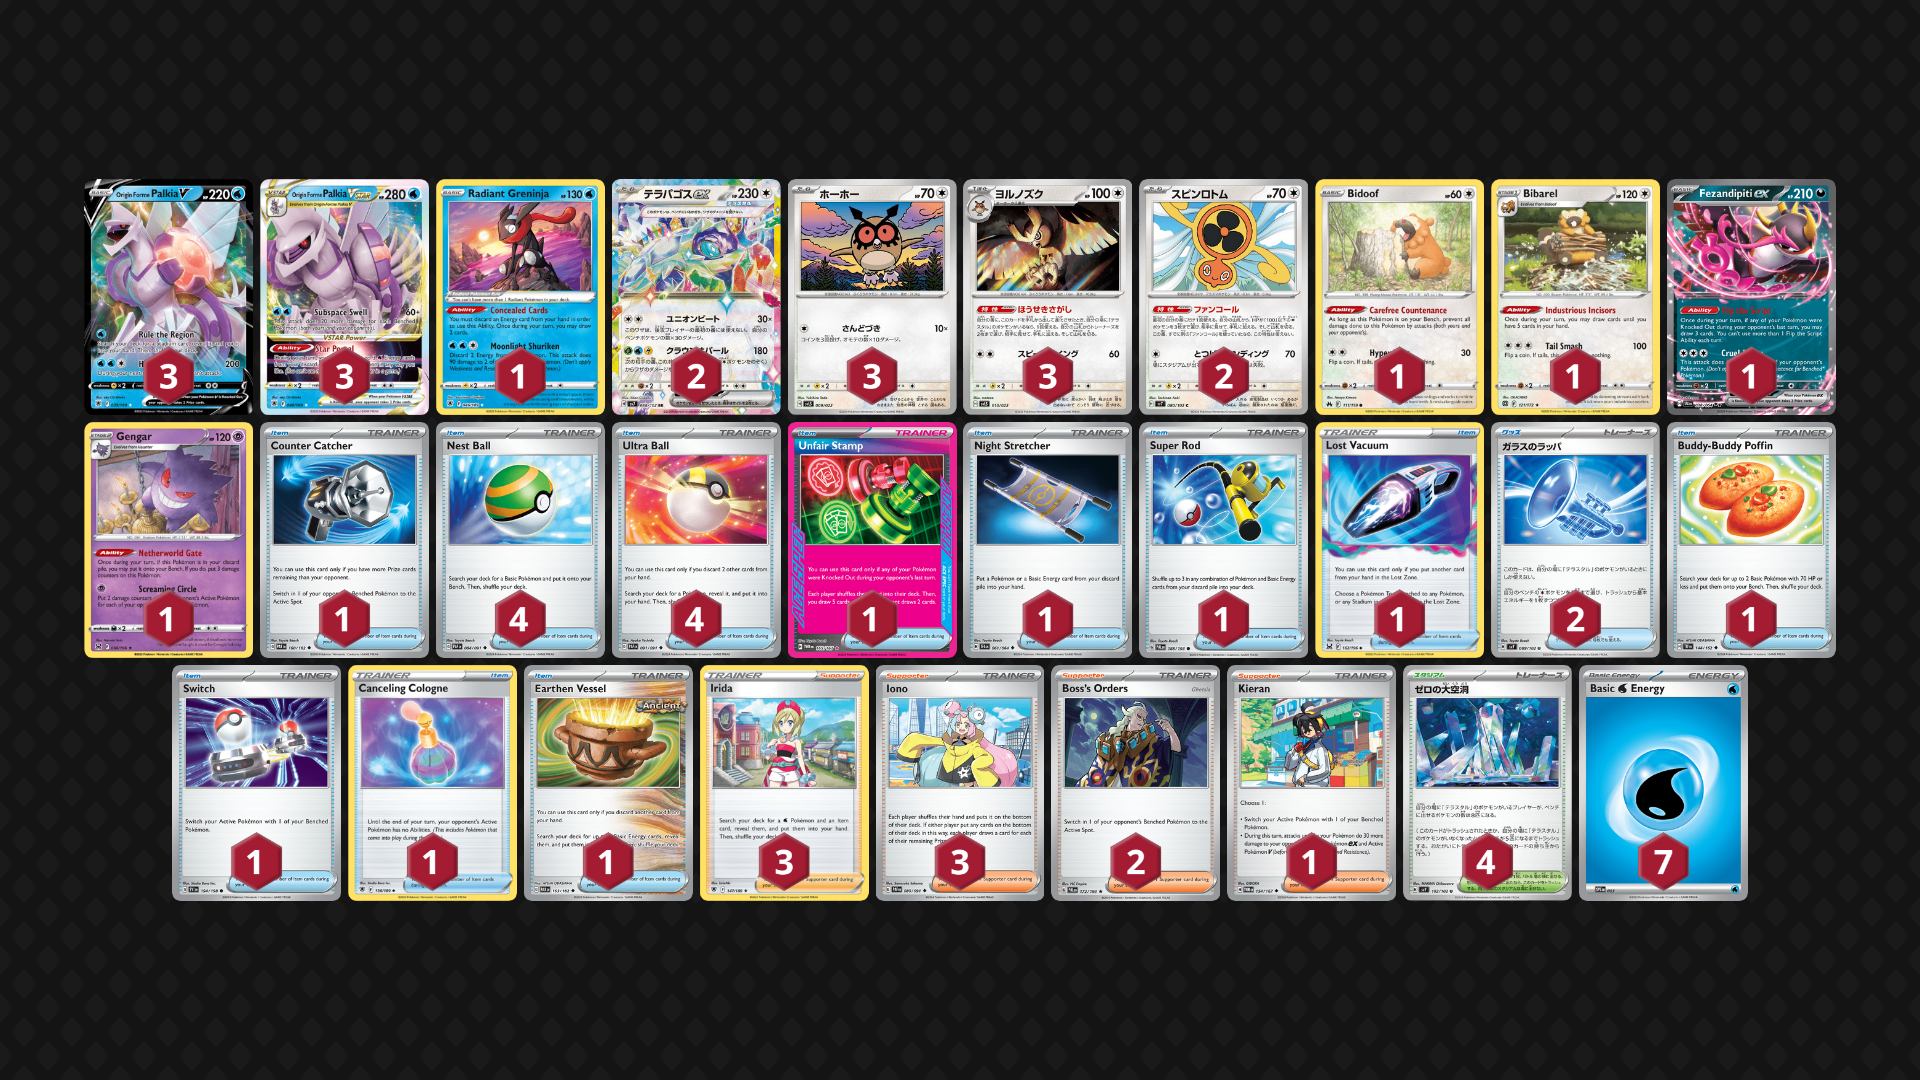
Palkia / Terapagos: Difficulty – 4/5
 <<< Click on either of the cards for the full deck list!
There is a lot of different ways you can play this deck. Your main task while piloting it is figuring out on the fly which of your Pokemon you need to focus on. Palkia Vstar is your largest damage dealer but it’s an evolution Pokemon that takes at least 2 turns to set up. Palkia does more damage for every Pokemon on both players’ bench. You will utilize the new Stadium card Area Zero Underground to increase the max bench capacity from 5 to 8. A full bench will let Palkia hit 220 damage even if your opponent has no other Pokemon in play. On top of that, it has a very powerful Vstar Ability that lets you attach up to 3 water energy from your discard pile. This can be used to power up Radiant Greninja for a sneaky bench KO or power itself up without having to commit your once-per-turn attachment from hand. But Palkia isn’t your only attacker. You also have access to Terapagos ex – a chunky basic Pokemon that has a similar attack to Palkia Vstar’s – the caveat being you can’t use it on your first turn. So with neither of your attackers able to deal significant damage on your first turn, it’s usually best to treat this deck as a slow starter like the aforementioned Charizard deck. Let’s talk about priorities and which Pokemon you really want to see early!
Priority 1) Fan Rotom, Terapagos ex & Radiant Greninja
- Fan Rotom lets you search for your support Pokemon – Hoothoot, Noctowl & Bidoof. These Pokemon are the foundation of your next turn. Without them, you likely won’t be able to get set up in time and fall too far behind. Fan Rotom lets you search for 3 of them, giving Rotom the top priority over picking just 1 of them!
- Terapagos ex NEEDS to be on your bench for Area Zero Underground to work. Which is the entire point of the deck by the way! Being able to have 8 Pokemon on your bench at a time lets both Terapagos and Palkia do more damage. Not only that, but Noctowl requires Terapagos to be on the bench in order to use it’s ability to search for 2 Trainer cards.
- Radiant Greninja discards a water energy from your deck (to later accelerate with Palkia or Glass Trumpet) while also drawing you 2 cards. Both of these effects are incredibly helpful, if not required in some situations.
Priority 2) Palkia V, Hoothoot & Bidoof
- Palkia will become your main damage dealer when you need to hit more than 240 damage. Since some decks only play Basic Pokemon, Terapagos can handle them on it’s own. But when it comes to Evolution Pokemon, only Palkia can deal enough damage to KO them in one hit.
- Noctowl and Bibarel are your support Pokemon. You want Hoothoot and Bidoof on your bench as early as possible so you can start to get value off their evolutions. The reason they’re priority 2 is that Rotom will search both of them out for you anyway.
Don’t Prioritize) Fezandipiti & Gengar
- You won’t need these Pokemon until everything else is set up! Gengar is used to get an additional Pokemon on the bench in the late game after you lose some to KO’s or Stadium changes.
- Fezandipiti on the other hand is only beneficial AFTER one of your Pokemon gets knocked out. Both of these Pokemon simply serve as warm bodies to boost the damage of Palkia and Terapagos.
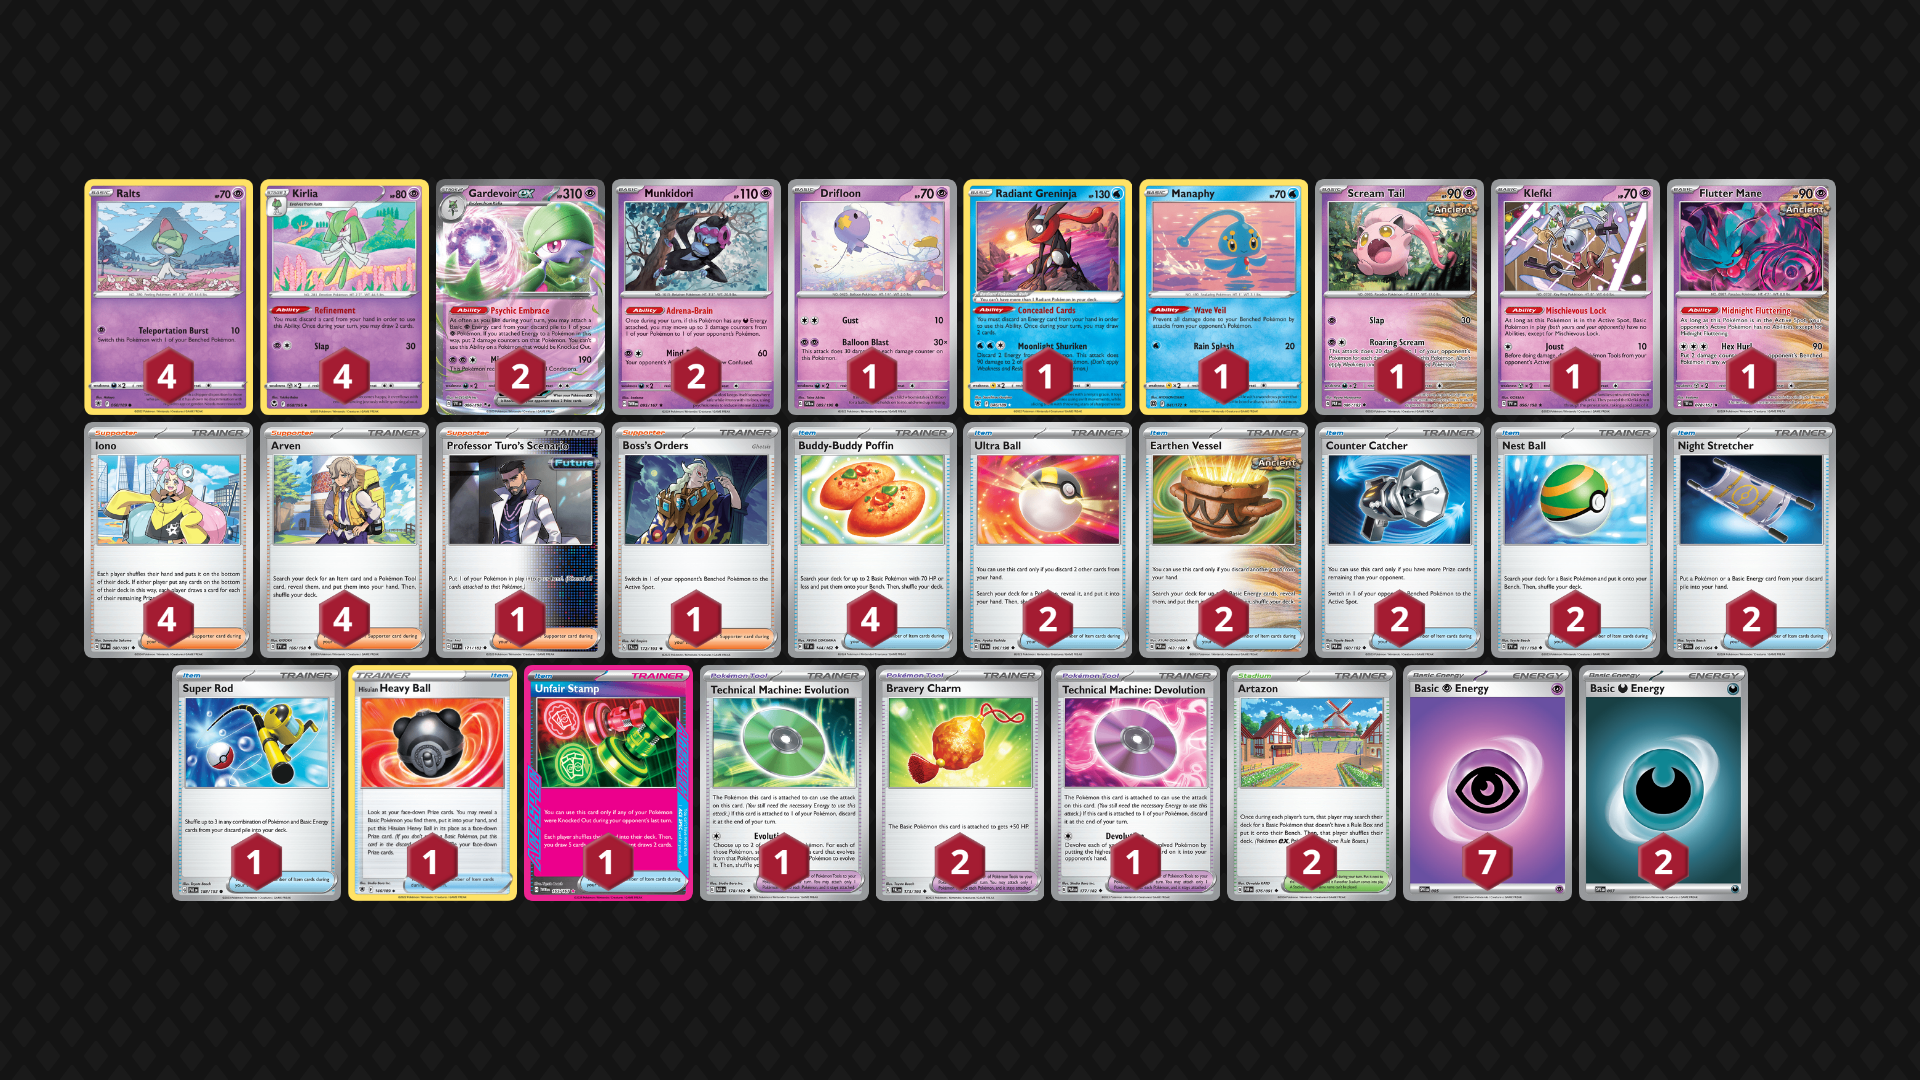
Gardevoir: Difficulty – 5/5
 <<< Click on the card for the full deck list! Have this open while reading the next section.
The turn 1 for Gardevoir is pretty straightforward! Get as many Ralts into play as you can. Against decks that can hit your Pokemon on the bench, you’ll also want to have Manaphy in play protecting them. It’ll take some experience to know which decks have the means to hit your benched Pokemon, so you’ll need to make a choice if you’d rather have a useless card taking up space just to be safe. I will say though, if you see your opponent plays Water Energy, you should expect a Radiant Greninja can snipe your bench so Manaphy is a good idea! You can round out your turn 1 with a Greninja of your own to draw cards or a Klefki / Flutter Mane in the active position to block some of your oppponent’s abilities. Click Here to see a standard Turn 1 board.
Turn 2 and onwards is where the difficulty of playing this deck really spikes. Your main win condition is dealing huge amounts of damage with Drifloon and Scream Tail. Both of these Pokemon deal more damage based on the number of damage counters on them (how much damage they have taken). Start practicing your 2’s and 3’s times tables because you’re going to be doing A LOT of mental math. Drifloon’s damage is 30 damage times the number of damage counters on it to your opponent’s active Pokemon while Scream Tail does 20 Damage for each damage counter to ANY of your opponent’s Pokemon. Yes, including the bench! Gardevoir ex is your main source of energy AND damage counters so it’s imperitive that you get it into play in order to start dealing damage. Gardevoir attaches a Psychic Energy from your discard pile to any of your Psychic Pokemon at the cost of placing 2 damage counters on it. Munkidori has an ability that lets you move up to 3 damage counters (30 damage) from one of your Pokemon to one of your opponent’s Pokemon. So with that all established… It’s time for a little math lesson!
Drifloon damage = 30 x [number of damage counters]
- 1 Energy in the discard pile = 2 damage counters
- Therefore 1 Energy in the discard pile = 60 Damage
- Stage 2 ex’s have up to 330 HP, so you will need to have 11 damage counters on Drifloon – the equivalent of 5.5 energy
- Except there are no half energies so you have to get a little spicy with it
- Attach a Bravery Charm to give Drifloon +50 HP – making it 120
- Move 5 energy to it with Gardevoir’s ability, placing 10 damage counters on Drifloon
- Attach two energies to a different Pokemon in order to utilize Munkidori’s ability
- Now you have 30 Damage on your opponent’s Pokemon plus your Drifloon hitting for 300! (30 x 10 damage counters)
Scream Tail’s magic number is 180 which requires 9 damage counters on it. This lets you KO benched Squawkabilly ex, Lumineon V and Fezandipiti ex with the help of your Munkidori. Squawkabilly wouldn’t even require a Bravery Charm as you only need 8 damage counters on Scream Tail to knock it out!
Lastly, I want to touch on the main draw engine of the deck – Kirlia. Kirlia is like having 4 more Radiant Greninjas on the bench but you can discard anything you don’t need. Though you’re still primarily discarding energy to work with it’s evolved form. The reason you want to flood your bench with Ralts is because you want to draw as many cards as possible off of Kirlia’s Refinement ability. So naturally this deck plays a lot of ways to get your Ralts out on turn 1. Poffins, Nest Balls and Artazon also have a handy little benefit of being able to grab your Scream Tail and Drifloon – even after shuffling them into your deck with Super Rod.
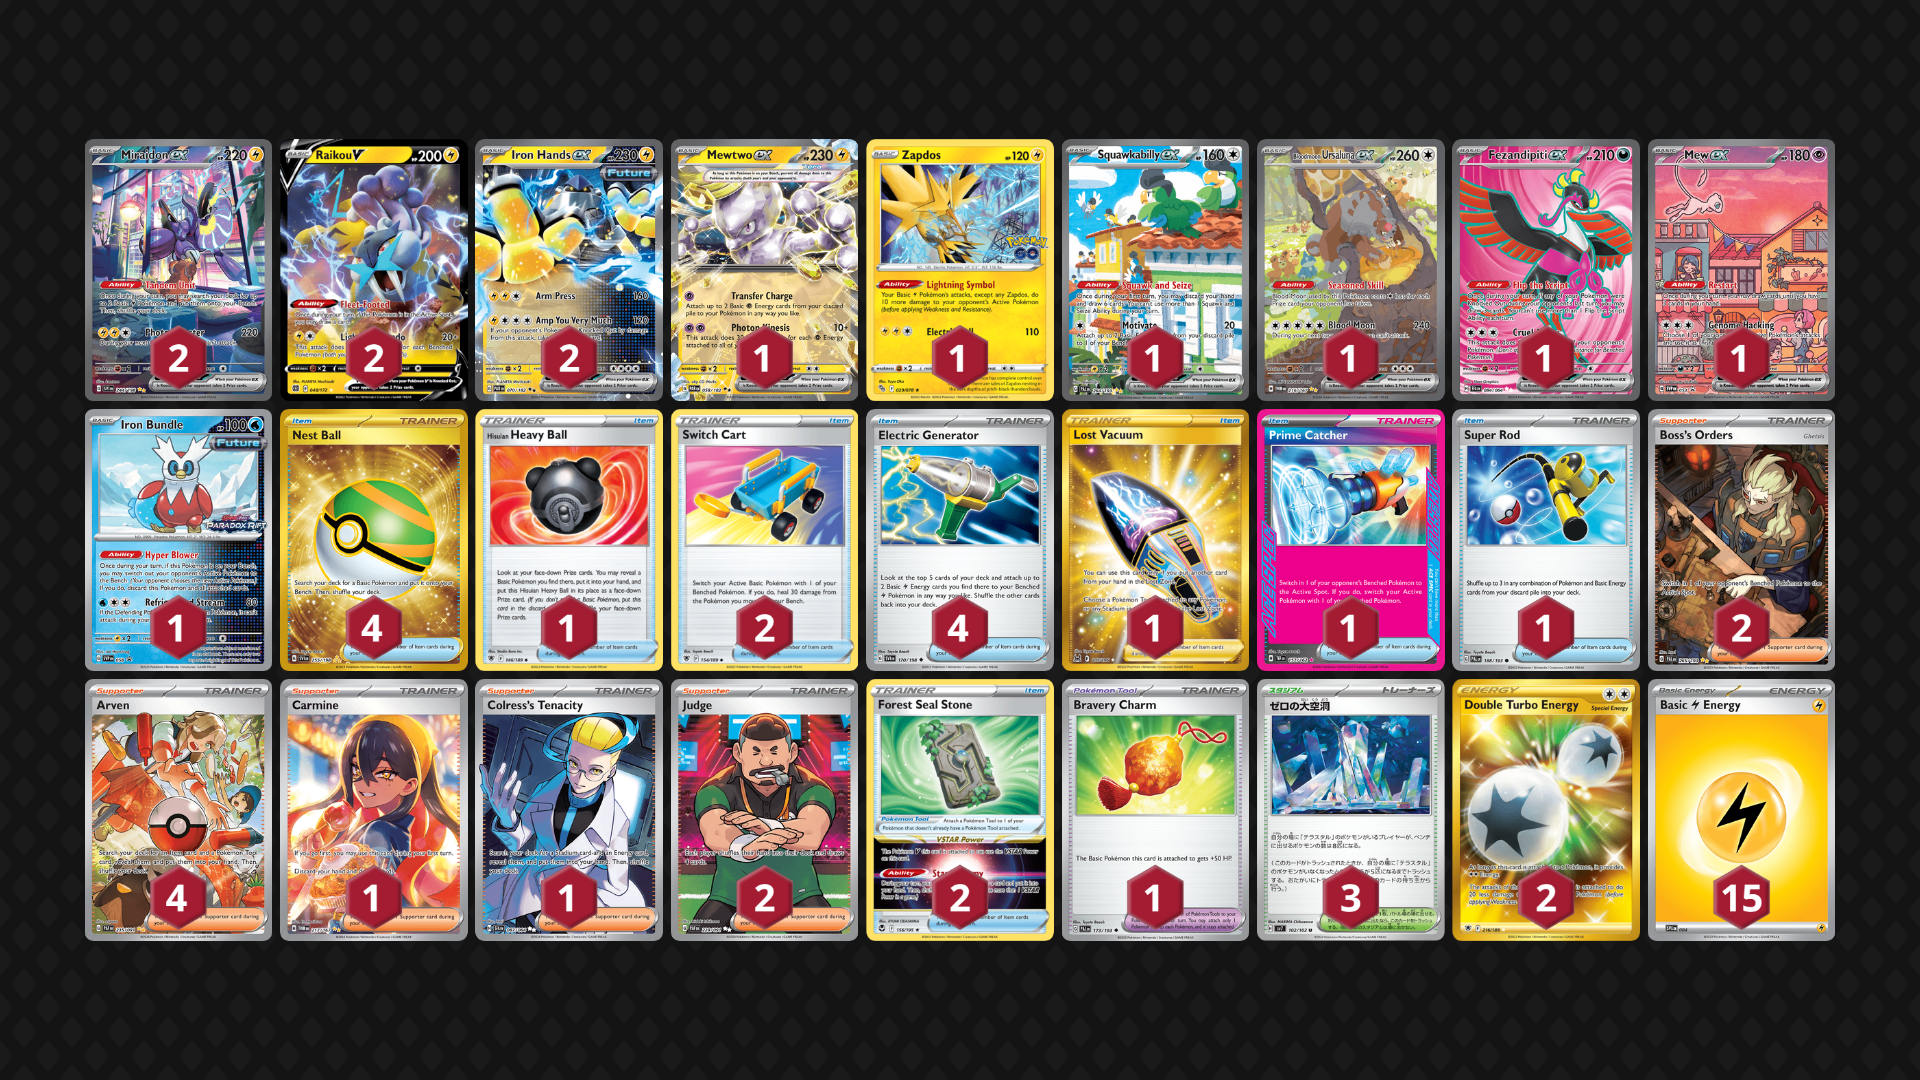
Miraidon: Difficulty – 1/5
 <<< Click on the card for the full deck list! Have this open while reading the next section.
I recommend this deck for anyone brand new to the Pokemon TCG. It has the easiest and most consistent strategy of all the decks available. Turn 1 you are looking for Miraidon ex in order to use it’s ability to put 2 more Electric Pokemon onto your bench from your deck. And wouldn’t you know it? Miraidon is also an Electric Pokemon! You can grab the second copy of it and use it’s ability for 2 more Pokemon! The Pokemon you attach energy to will dictate how you play the rest of the game. It sounds like a big deal, but don’t worry – there’s an easy way to remember which Pokemon to pick!
- If your opponent plays low-HP Pokemon like Charmander, Ralts or Hoothoot: Iron Hands ex will be your main attacker. Iron Hands’ Amp You Very Much attack lets you take an additional prize card when you KO a Pokemon with it.
- If they play big HP Basic Pokemon like Roaring Moon, you’ll be attacking with Miraidon ex and Raikou V. Make sure you get Zapdos as well so you can hit for 230 damage instead of your cap of 220 without it!
- Mewtwo ex is a Tera Pokemon and therefore lets you gain an additional 3 bench spots with your Area Zero Underground Stadium. This lets Raikou deal more damage. Just like the aforementioned Palkia/Terapagos deck.
Once you have your Pokemon in play, it’s time to get those Lightning Energy attached! You have 4 Electric Generators which let you attach up to 2 energy from your deck to you benched Pokemon. You also play a lot of ways to draw cards (Squawkabilly ex, Mew ex & Carmine on your first turn with Fezandipiti ex on subsequent turns) and search for the generators. Remember Forest Seal Stone? Miraidon plays 2 of them so you have a higher chance of drawing into it. It’s not uncommon to see an Arven on turn 2 for Electric Generator and the stone – only to use it to search for another generator. It is pretty easy to get at least one of your Pokemon fully powered and attacking on Turn 2 or even Turn 1 if you go second! Utilize your Prime Catcher and Boss’s Orders in later turns to target your opponent’s liabilities on the bench in order to stay ahead on the prize trade. And just like that, your victory is basically guaranteed! Click Here to see a standard Turn 1 board.
Arceus / Cinderace: Difficulty – 4/5
 <<< Click on either of the cards for the full deck list!
Probably the most convoluted of all the decks, this one has you “passing the torch” so to speak by changing your primary attacker halfway through the game. Both Arceus V and it’s evolution, Arceus Vstar, can accelerate 3 basic energies from your deck to any of your Arceus in play. The Vstar version has the benefit of also dealing 200 damage with it but it’s not that important. The main thing is getting energy into play! So while Arceus is attacking, you’ll be setting up your Scorbunny and Charcadet on your bench. Cinderace ex will become our primary attacker dealing 280 damage or 330 with Max Belt to KO any other Stage 2 ex’s. In order to get Cinderace powered up, you utilize Magma Basin to attach an energy from your discard pile to it, as well as using Armarouge’s ability to move any Fire Energy from your benched Pokemon to your active. And look at that! You threw 3 of them on your benched Arceus last turn. Isn't that convenient? There’s also a single copy of Glass Trumpet to attach 2 more Fire Energy from your discard pile. Click Here to see a standard Turn 1 board.
It’s probably getting pretty old listening to me talk about the support Pokemon by now but I need to mention them incase anyone reading this skipped over the previous 5 times I mentioned them. Fezandipiti ex and Radiant Venusaur draw you cards. Lumineon V searches for any supporter in your deck but this time we aren’t playing Forest Seal Stone to combo with! I threw a curve ball at you didn’t I? Well that’s because Arceus Vstar’s ability lets you search for two cards instead of just 1.
With Cinderace’s 0 retreat cost, you can freely switch it out with any of your benched Pokemon. Including another Cinderace… Then you can simply use Armarouge to move the energies attached to your now benched Cinderace to your fresh active one! If your opponent isn’t able to deal with its 320 HP in one hit, you’re on cruise control for the rest of the game. It’s important that you don’t rest on your laurels though. If you don’t have a powered up Cinderace, your opponent can target your Armarouge and slow you down. In the late game, Lumineon and Fezandipiti become liabilities and you aren’t playing any cards to remove them yourself. So weigh your options on your first couple turns to decide if it’s worth playing them!
 <<< Click the Play! Pokemon logo to find our League on Pokemon’s website!
I want everyone who comes to League, whether it’s their first time or hundredth, to be able to play a fun and compelling game of the Pokemon TCG. I know there are more simple ways to get into Pokemon like Starter Decks or the more recent Two-Player Battle Academy, but with those you’re playing a watered-down version of the trading card game. You’re not getting to experience the FULL game and I think you’re doing yourself a disservice with it. So with the decks that I’ve built above, they each serve to teach different components of the card game.
You learn about Stage 2’s and card sequences/combos with Charizard. You get to experience how crazy a single turn can be with Roaring Moon. Palkia / Terapagos shows you how conditional effects work and why it’s important to have a plan on what you want to do next turn. Gardevoir… Well… Gardevoir reinforces your Grade 4 multiplication fundamentals which is deceptively difficult to remember in the moment. Miraidon is a fantastic introduction to Pokemon as you get to experience all of the basic principles of the game – card searching, damage calculations and probability of finding energy off of your Electric Generators. Lastly with Cinderace, you get to play a more unique style where all of your decisions in the early game pay off in the late game.
All the while, these decks that I’ve crafted are able to actually compete with any other top meta deck being played by other people. You aren’t stuck playing in a limited format with a low power level. You are playing a full and proper game of the Pokemon Trading Card Game. And that’s really cool. So please, I implore you, come play Pokemon at your local League here at Elite4 Games. It’s free and you’re going to have a blast!

